Table of Contents
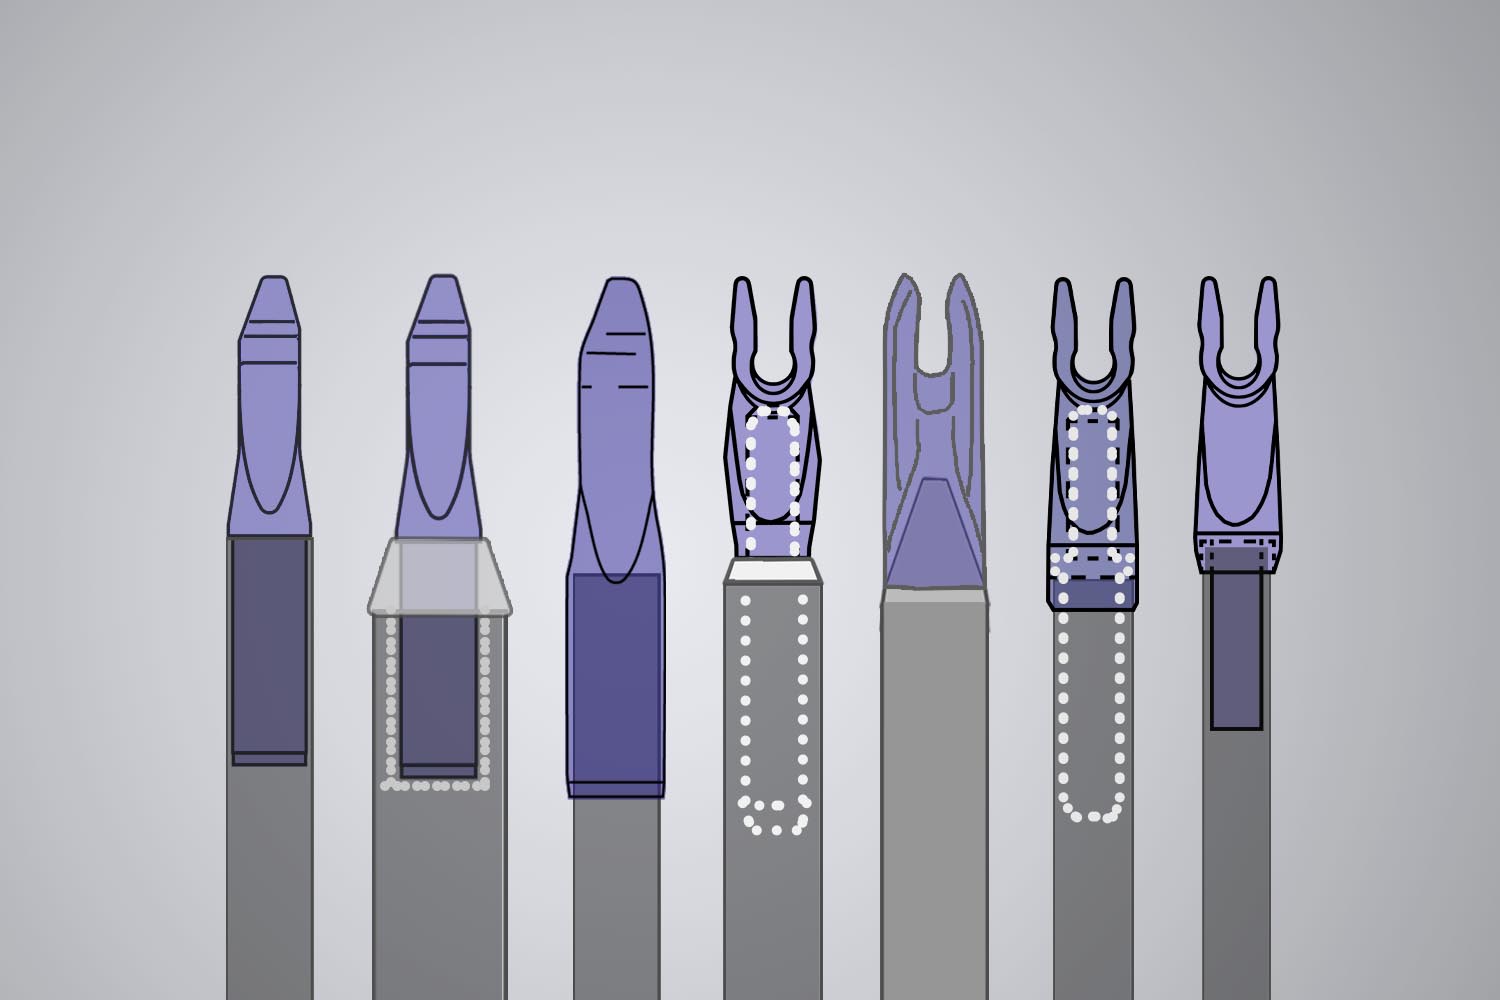
- Terminology & Nock Types
- Insert-Nocks
- Out-Nocks
- Pin-Nocks
- Glue-on-Nocks
- Special Nocks:
- Pin-Out-Nocks
- In-Out-Nocks
Terminology & Nock Types
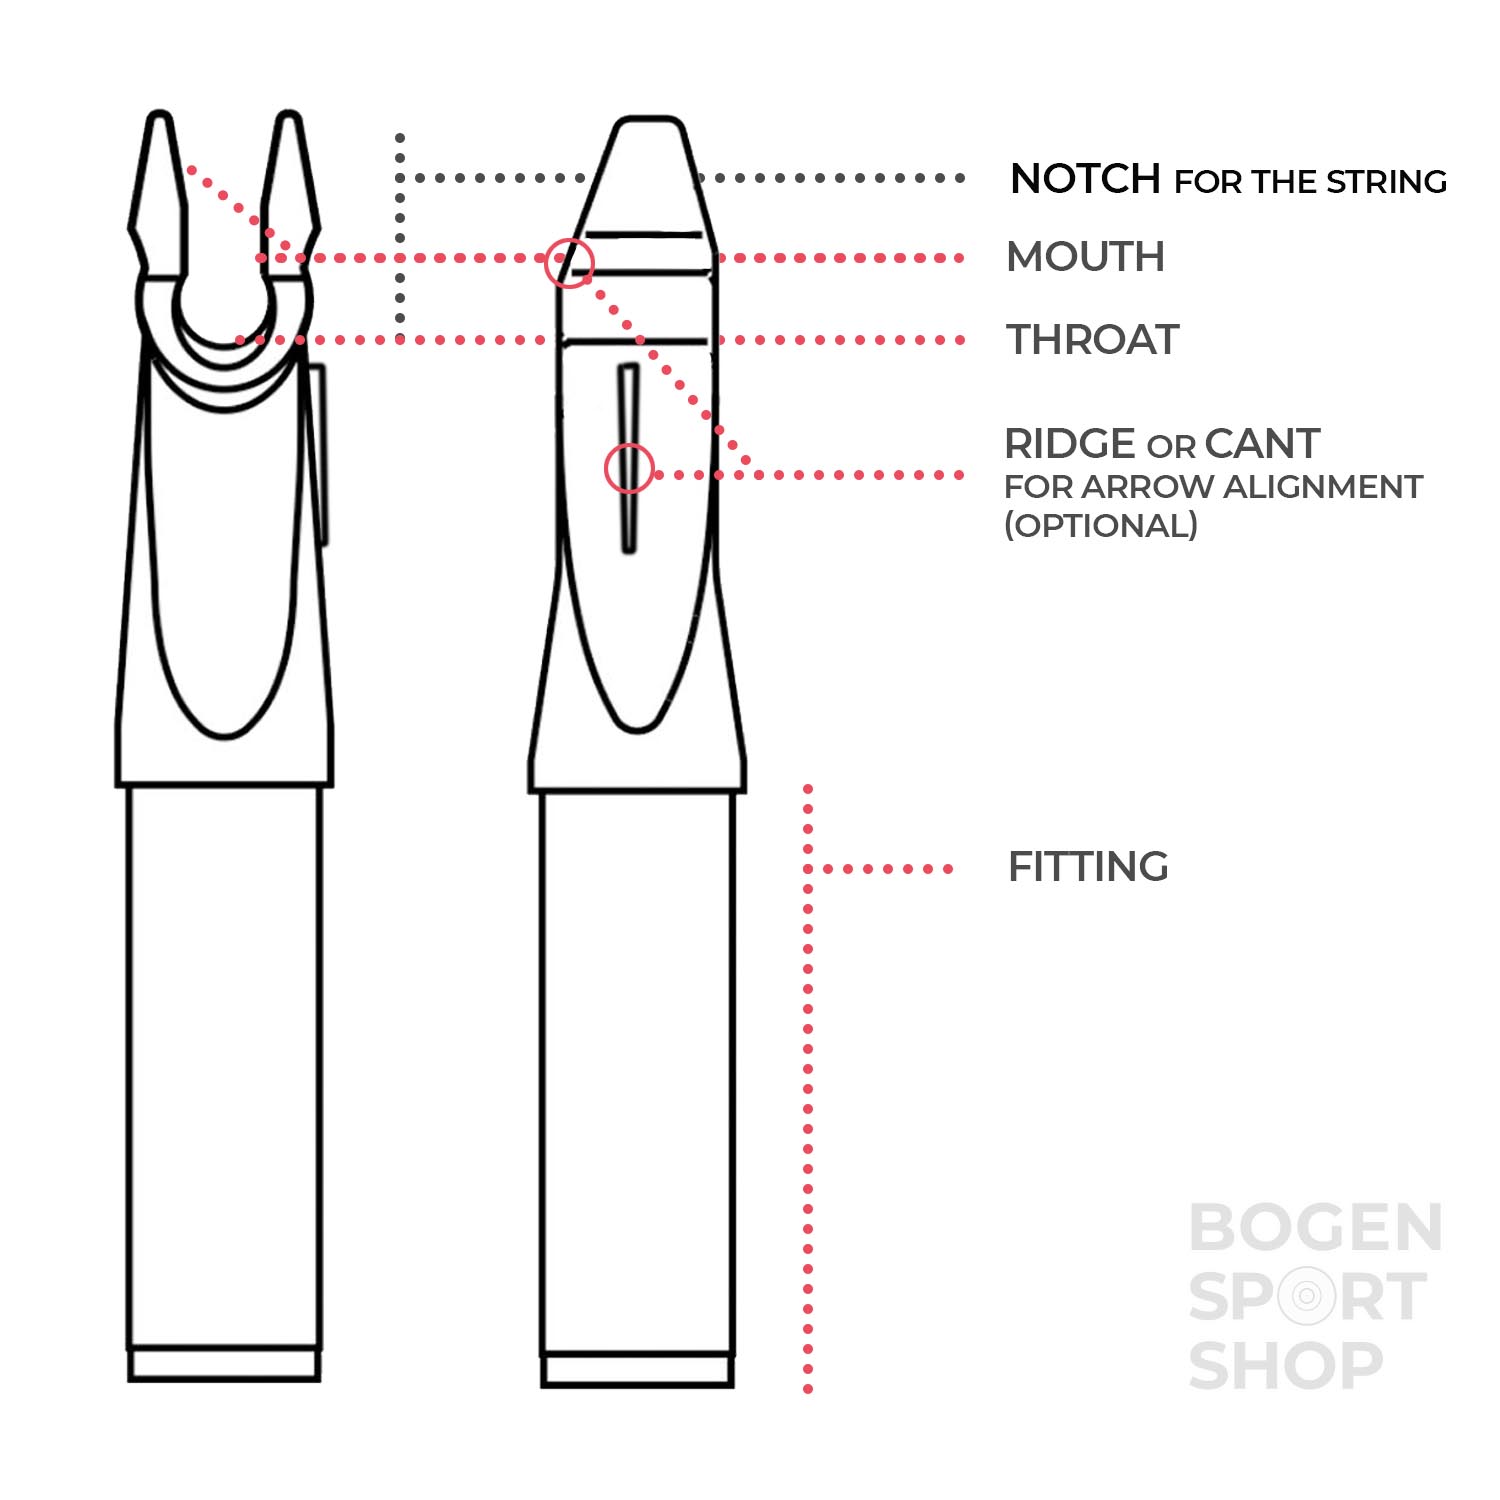
The nock is a fairly small part on the arrow and yet there are some details about it that you should know and pay attention to. For example, it is very important how the nock is shaped. The part where the notch for the string is molded, consists of two parts. The two ’nock wings‘ are going by the term „throat„, which describes the upper part of the notch and is slightly convex towards the string. The area below is called the „mouth“ and refers to the concave shaped area of the notch.
The purpose of this change of shape is that the nock sufficiently fixes the arrow to the string, but without clamping to it. In very simplified terms, the nocked arrow „clicks“ to the string and immediately falls off as soon as you tug on the string with your finger.
Different nocks, or nock shapes, are more or less suitable for some types of strings. This refers in particular to diameters. There are currently only two common ‚mouth‘ sizes. The archery parts manufacturer Beiter calls these #1 and #2, Easton in turn directly with the diameter value .088 and .098 inch (so 2.2 mm and 2.5 mm).
For beginners usually apply: For the Recurve you should use the #1 (Beiter), or .088 (Easton) and for the Compound the #2, or .098. These should also correspond to common strings of the respective discipline.
The so-called ‚fitting‚ describes the part of a nock that is connected to the shaft. There are now a few different types, which will be explained in more detail below.
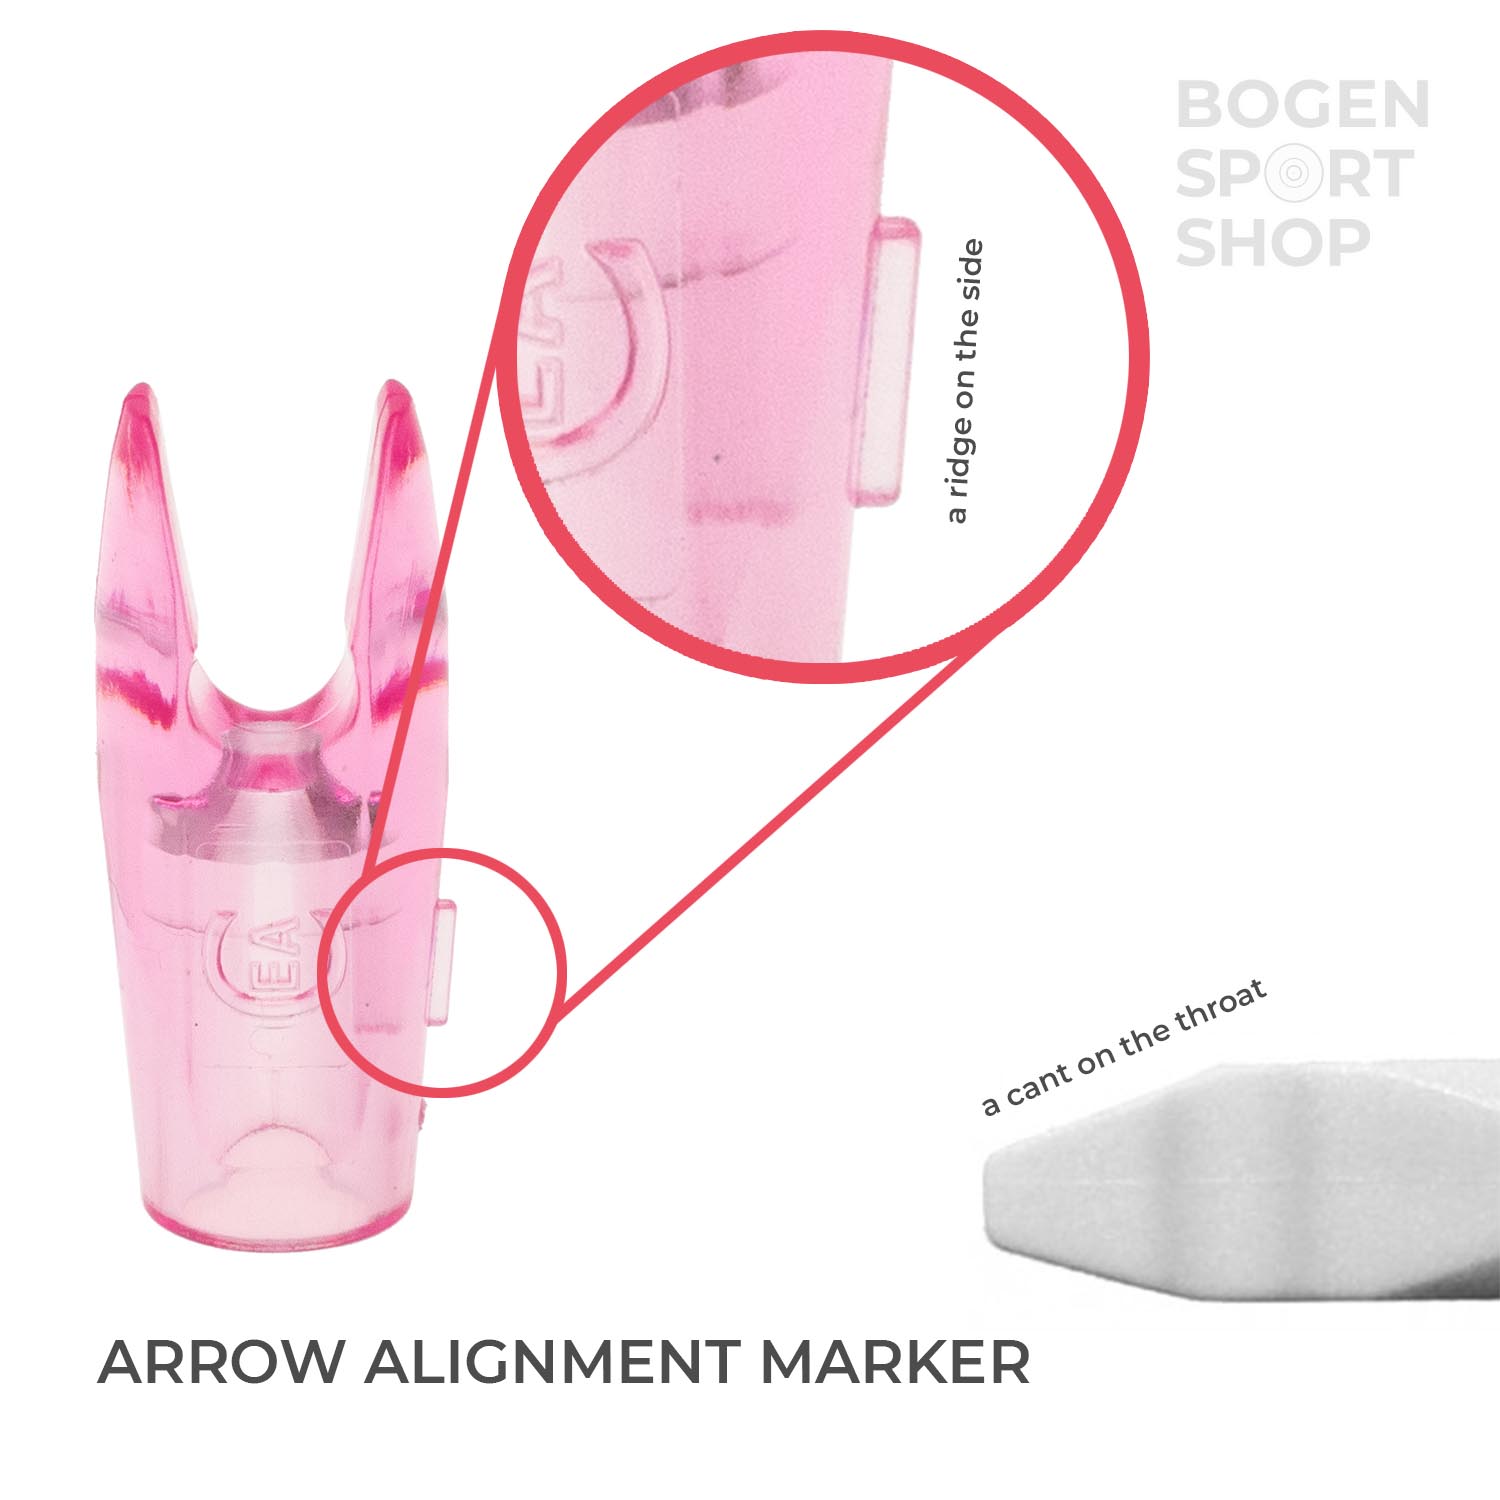
Optional: With most nock manufacturers, markers are attached to the nock. This takes over the task of a cock feather. The manufacturer Beiter, for example, has an asymmetrical cant on the topside of the throat (this bevelled side should always point upwards towards the archer), while other manufacturers provide the outer edge of a nock with a line-like elevation, a ridge (it points towards the archer and away from the bow).
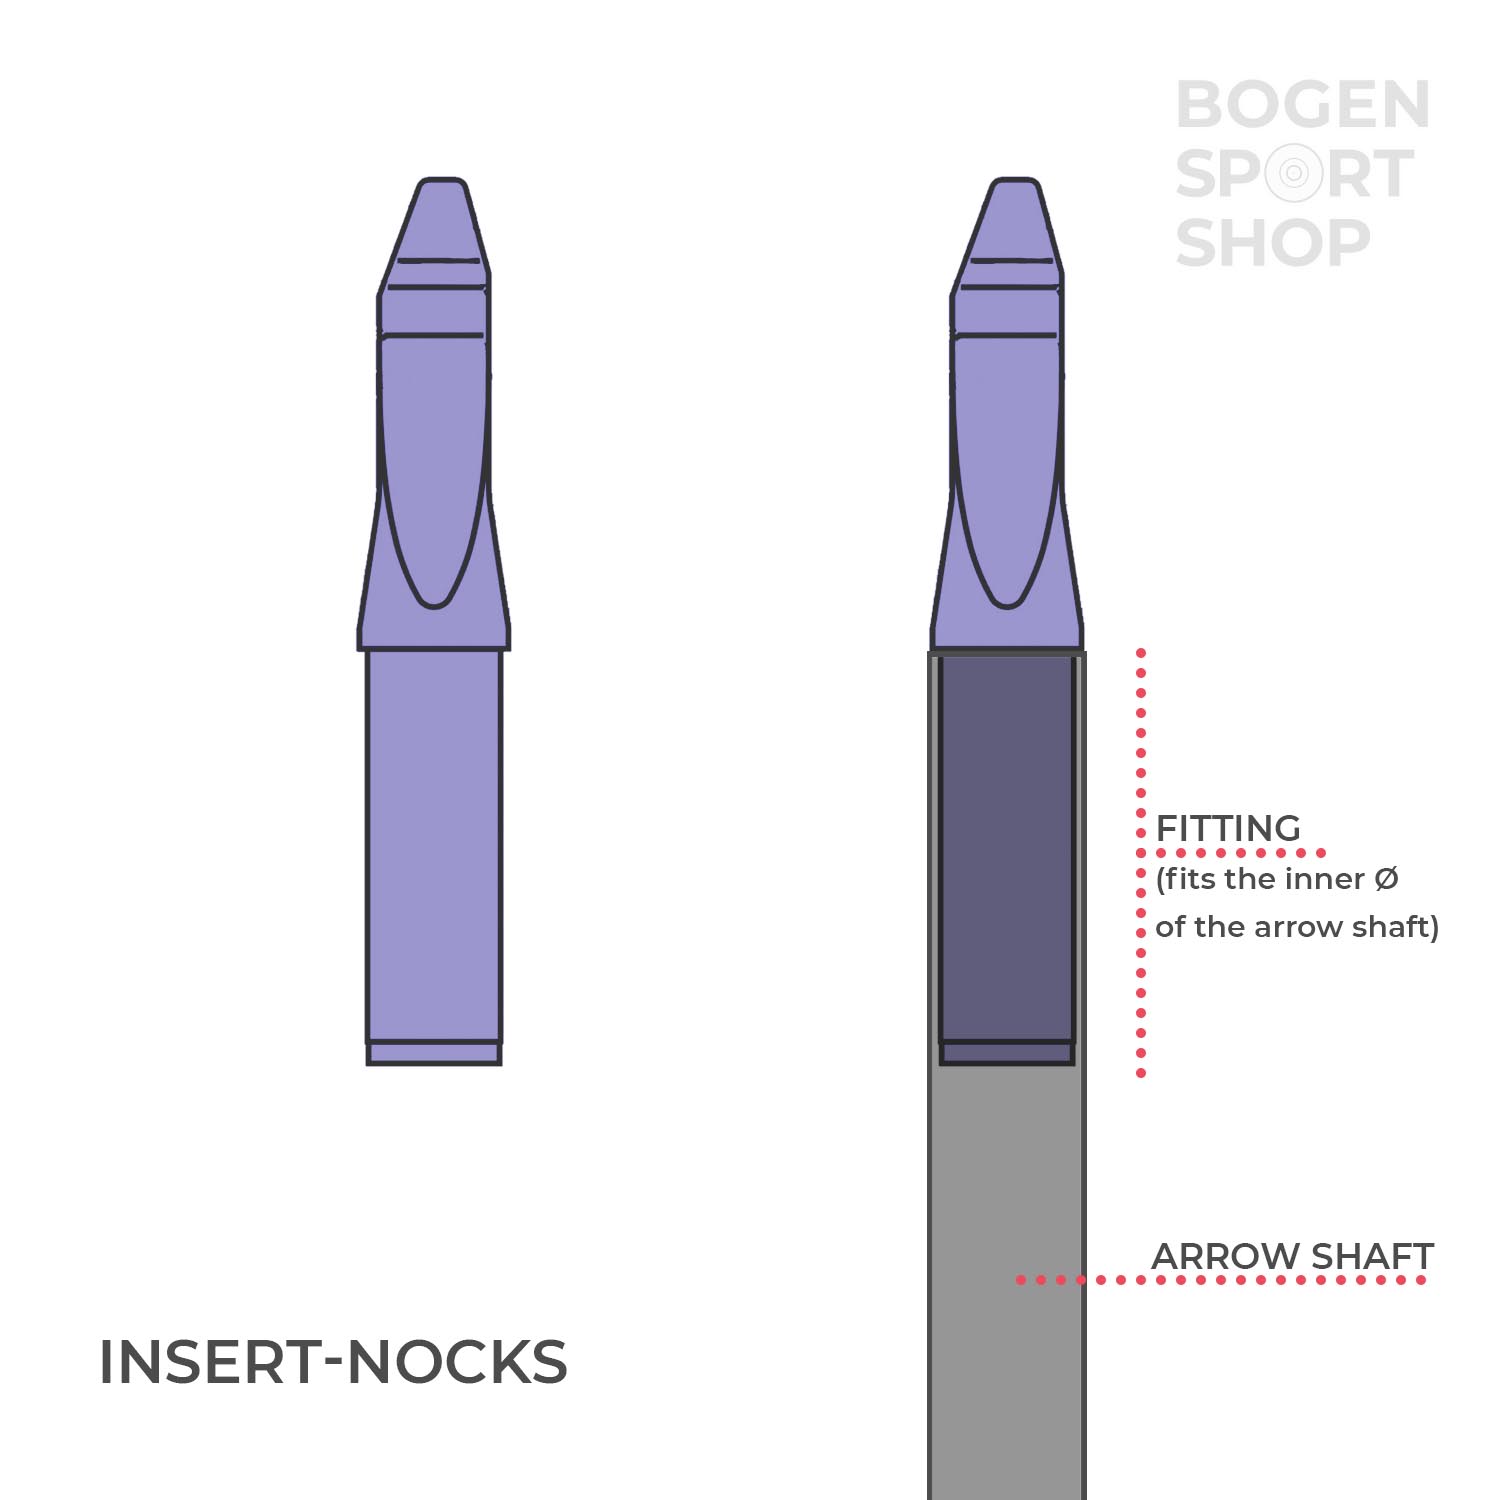
Insert-Nocks
Insert nocks, or also called in-nocks, are probably the most uncomplicated and therefore also most used nocks, since they are available for almost every shaft diameter size (except for the thinnest carbon shafts). You can also use them with many aluminum shafts. As the name implies, the insert nock is plugged into the shaft. This means that the fitting of the nock needs to correspond with the inner diameter of the shaft, so that a key-lock principle can easily attach the nock to the shaft.
Insert nocks are not directionally bound and can be easily rotated and adapted to the fletching, for example. There are also In-Out-Nocks from Beiter, for example, which are built in such a way that you can insert and still have a part of the cam over the shaft.
There is also the possibility to insert bushings into aluminum arrows beforehand and to plug in the nock afterwards. Bushings are metal inserts that are inserted into the nock ends of the arrows to additionally protect the shafts from damage by other arrows.
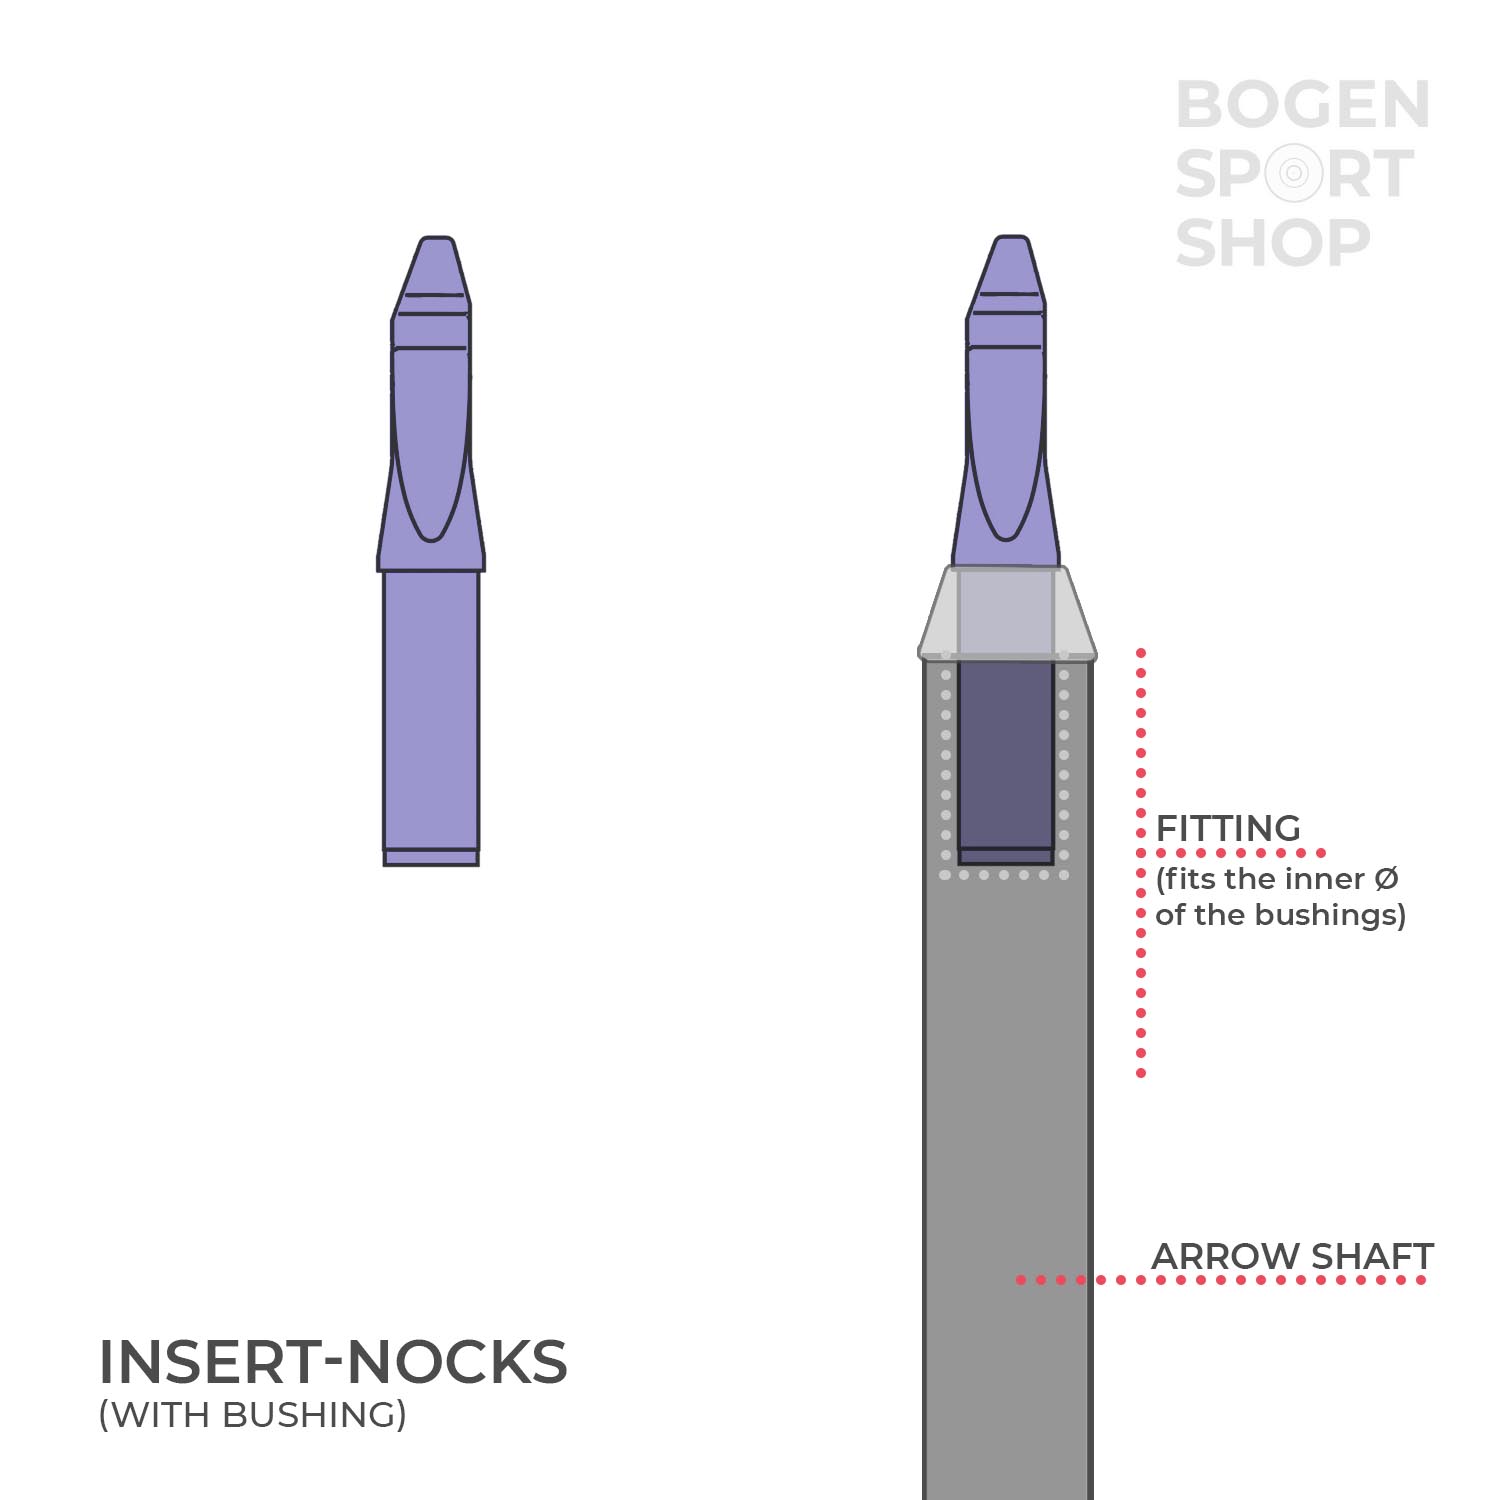
Uni-Bushing: Uni-Bushings reduce the arrow diameter to .166″ to fit Easton’s G-Nocks or Beiters 12er nocks.
Super-Uni-Bushing: For thicker arrows, such as the Easton X23, the so-called Super Uni Bushing reduces the arrow diameter to .245″ to fit the larger Easton Super Nocks or Beiter 19 nocks.
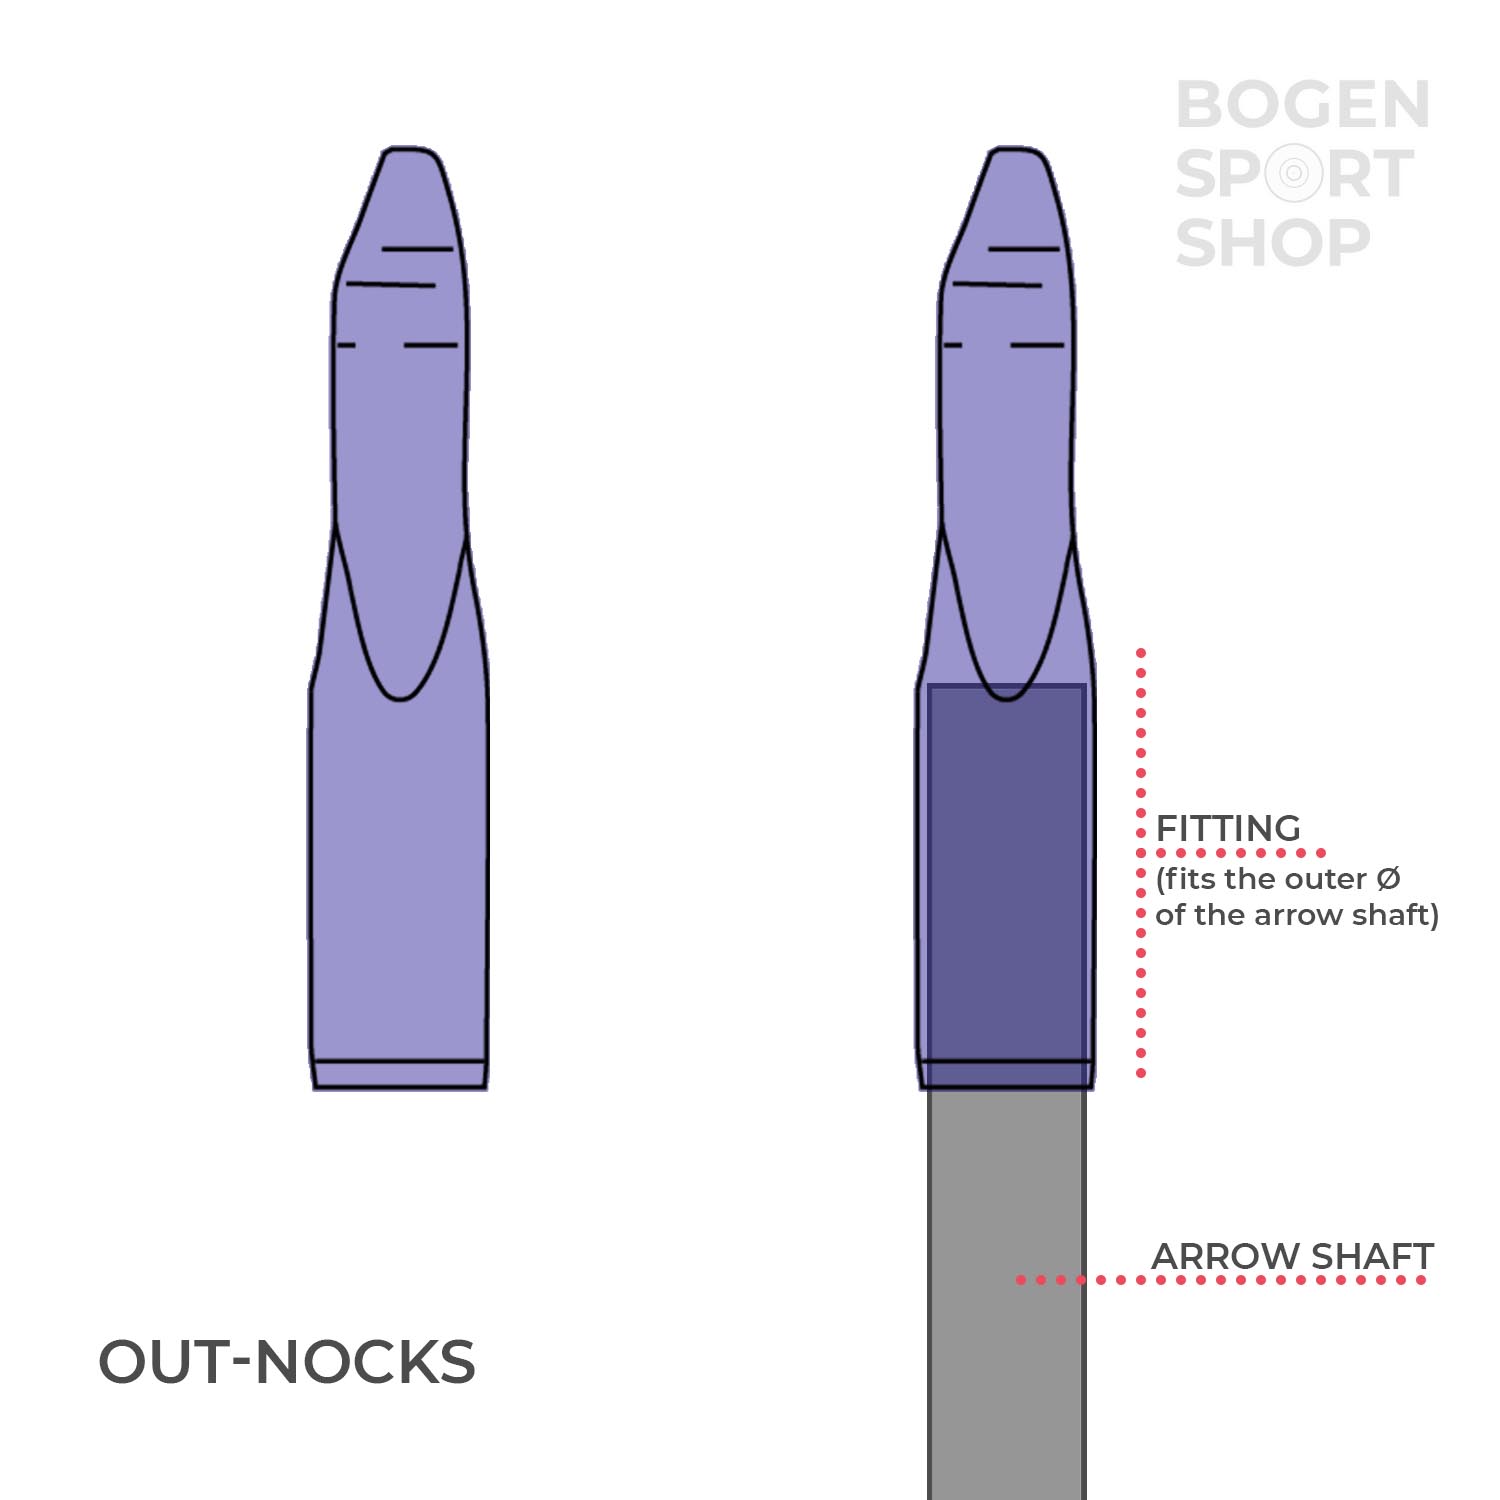
Out-Nocks
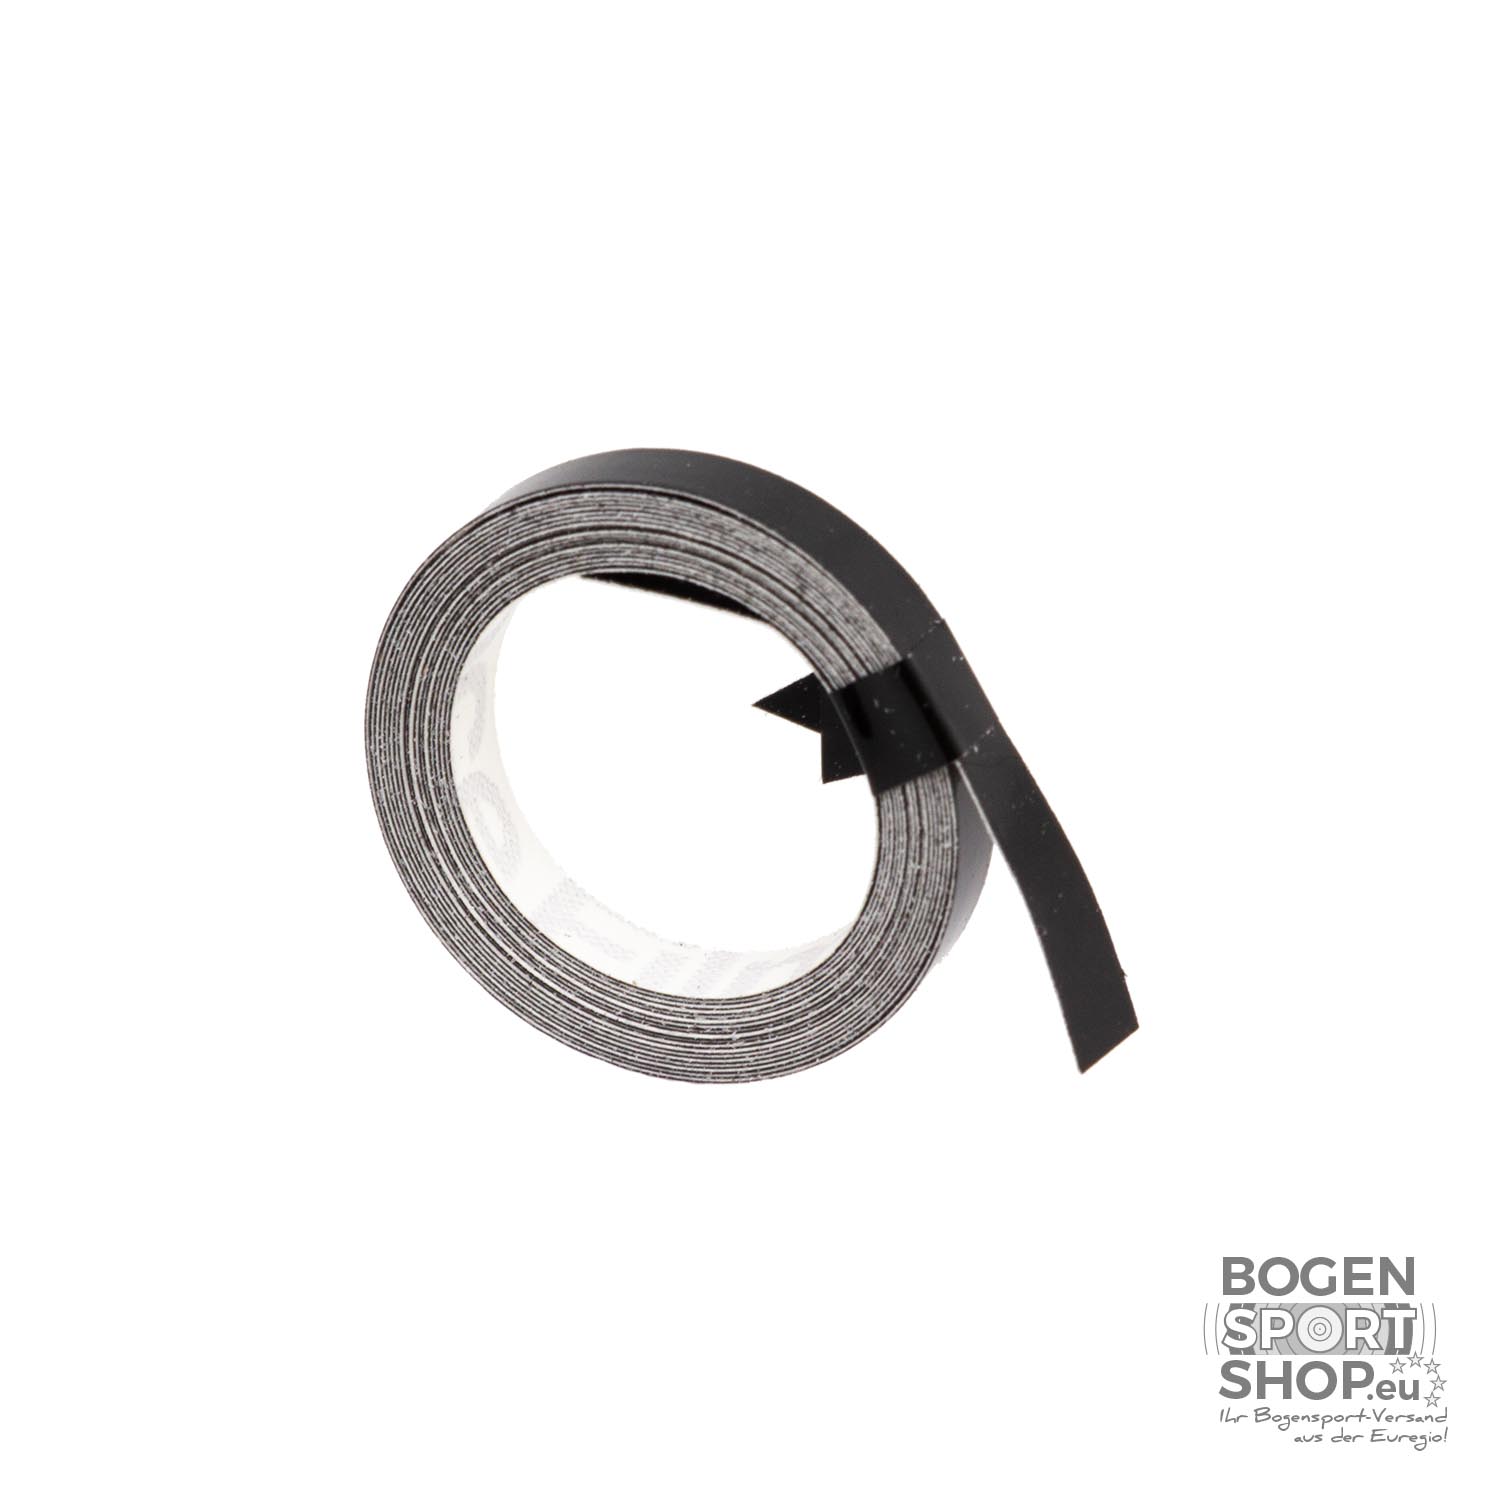
Out-Nocks have a fitting that has to match the outer diameter of the arrow shaft. Out-Nocks from Beiter come perfectly fitted to the corresponding shaft. This means, that they fit perfectly to the outside diameter, but are not fixed to the shaft like that. In the enclosed mini manual the use of a small piece of Teflon tape is suggested, which can easily be found in any well-stocked DIY store.
Place a small piece of tape between the nock and the shaft and clamp it in this way. The strength with which the nock is to be attached to the shaft can be minimally determined by the size of the Teflon tape piece.
Is Teflon tape really necessary?
I know for example that some other Out-Nock users simply tear off a piece of foil (e.g. cling film) and clamp it in between. I personally use Out-Nocks from Beiter and attach them to my ACE, resp. X10 arrow shafts with a small scrap of black tape, which is used to fix Spinwings to the shaft. The advantage of this is that because of me carrying some spinwings with me anyways, I can change broken or otherwise damaged nocks ‚on-the-spot‘ and do not have to have an extra Teflon tape with me.
Sometimes the tape gets a little too big, so that the nock is anchored too tightly to the shaft. This is somewhat awkward for later adjustment to the springs, so rather use a little less tape. The rule should be: enough so that the nock does not fall off, but is still comfortable to rotate.
Example of “ in-between material“: fixing tape, which is already used for the Spinwings. But in principle, you could use anything you have at hand, like thin foil, etc.
Why „out-nocks“ at all when you can „insert nocks“?
Of course. Like everything else in archery, the answer to this question is colorful and multi-faceted or bland and highlightless, depending on your point of view. Much can be based on experience, or at the end of the day: just personal taste.
The basic question in choosing a nock these days is: what will protect my arrow best on impact with another arrow?
You can find out-nocks among top athletes, especially in the East-Asian region, e.g. among Korean archers. Coaches there have, according to their own information, apparently made the experience that out nocks protect the arrow better on impact and also tend to forgive minor draw hand errors. A view that is also discussed in many international archery forums.
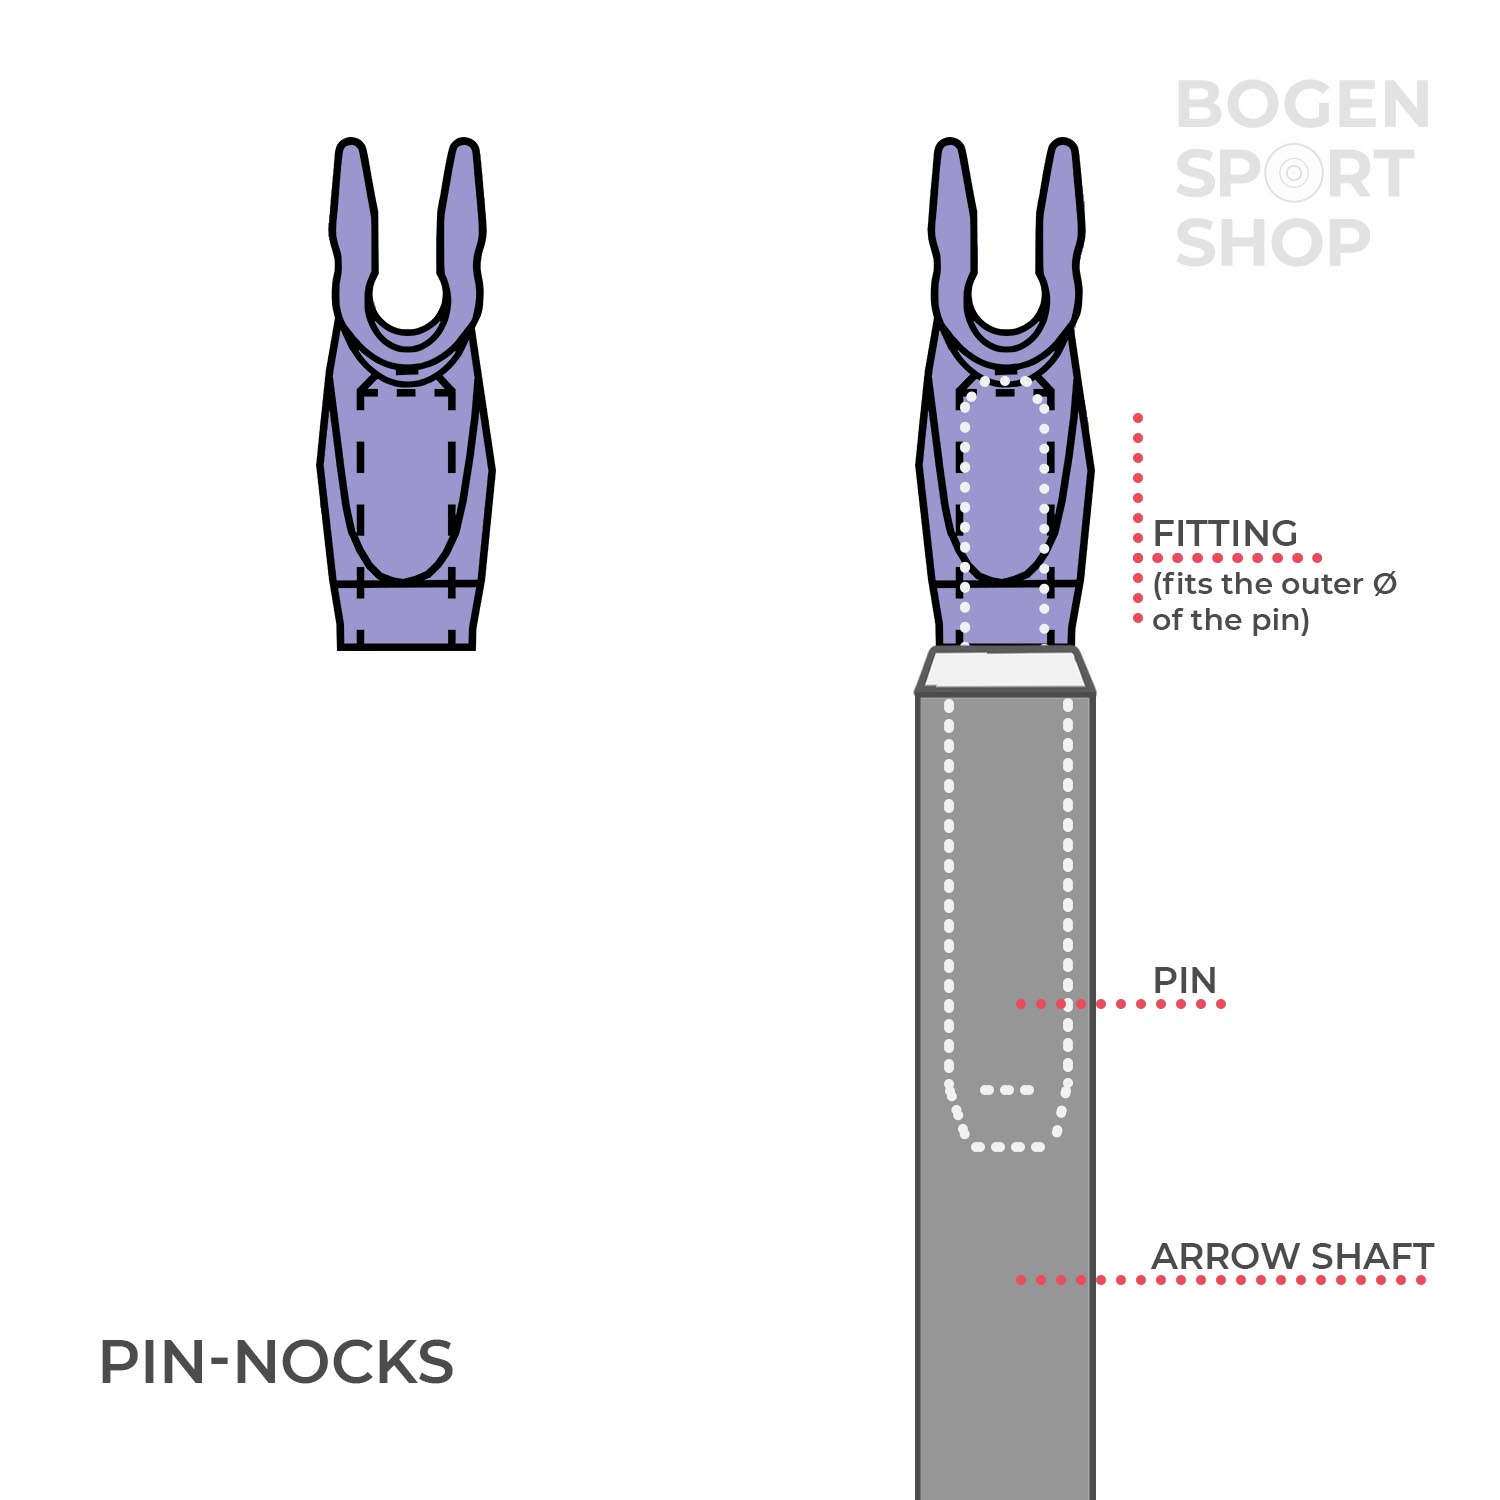
Pin-Nocks
Pin nocks are shorter compared to insert & out nocks. But in principle, these must also be plugged on. Here, however, not just directly onto the shaft, but onto an intermediate part, the so-called pin insert. This is previously glued into the shaft like the point of an arrow.
The most widespread assumption with a pin nock setup is probably that the arrow is best protected from impacting arrows. But there are also many voices that contradict this. A pin would possibly protect the front arrow, but destroy the impacting arrow, or at least damage the front arrow as well.
More interesting here is the consideration of the arrow behavior influenced by the pin (more information about dynamic arrow behavior can be found here). But a decisive added value especially for beginners could not be named. You have to try it out if you are interested.
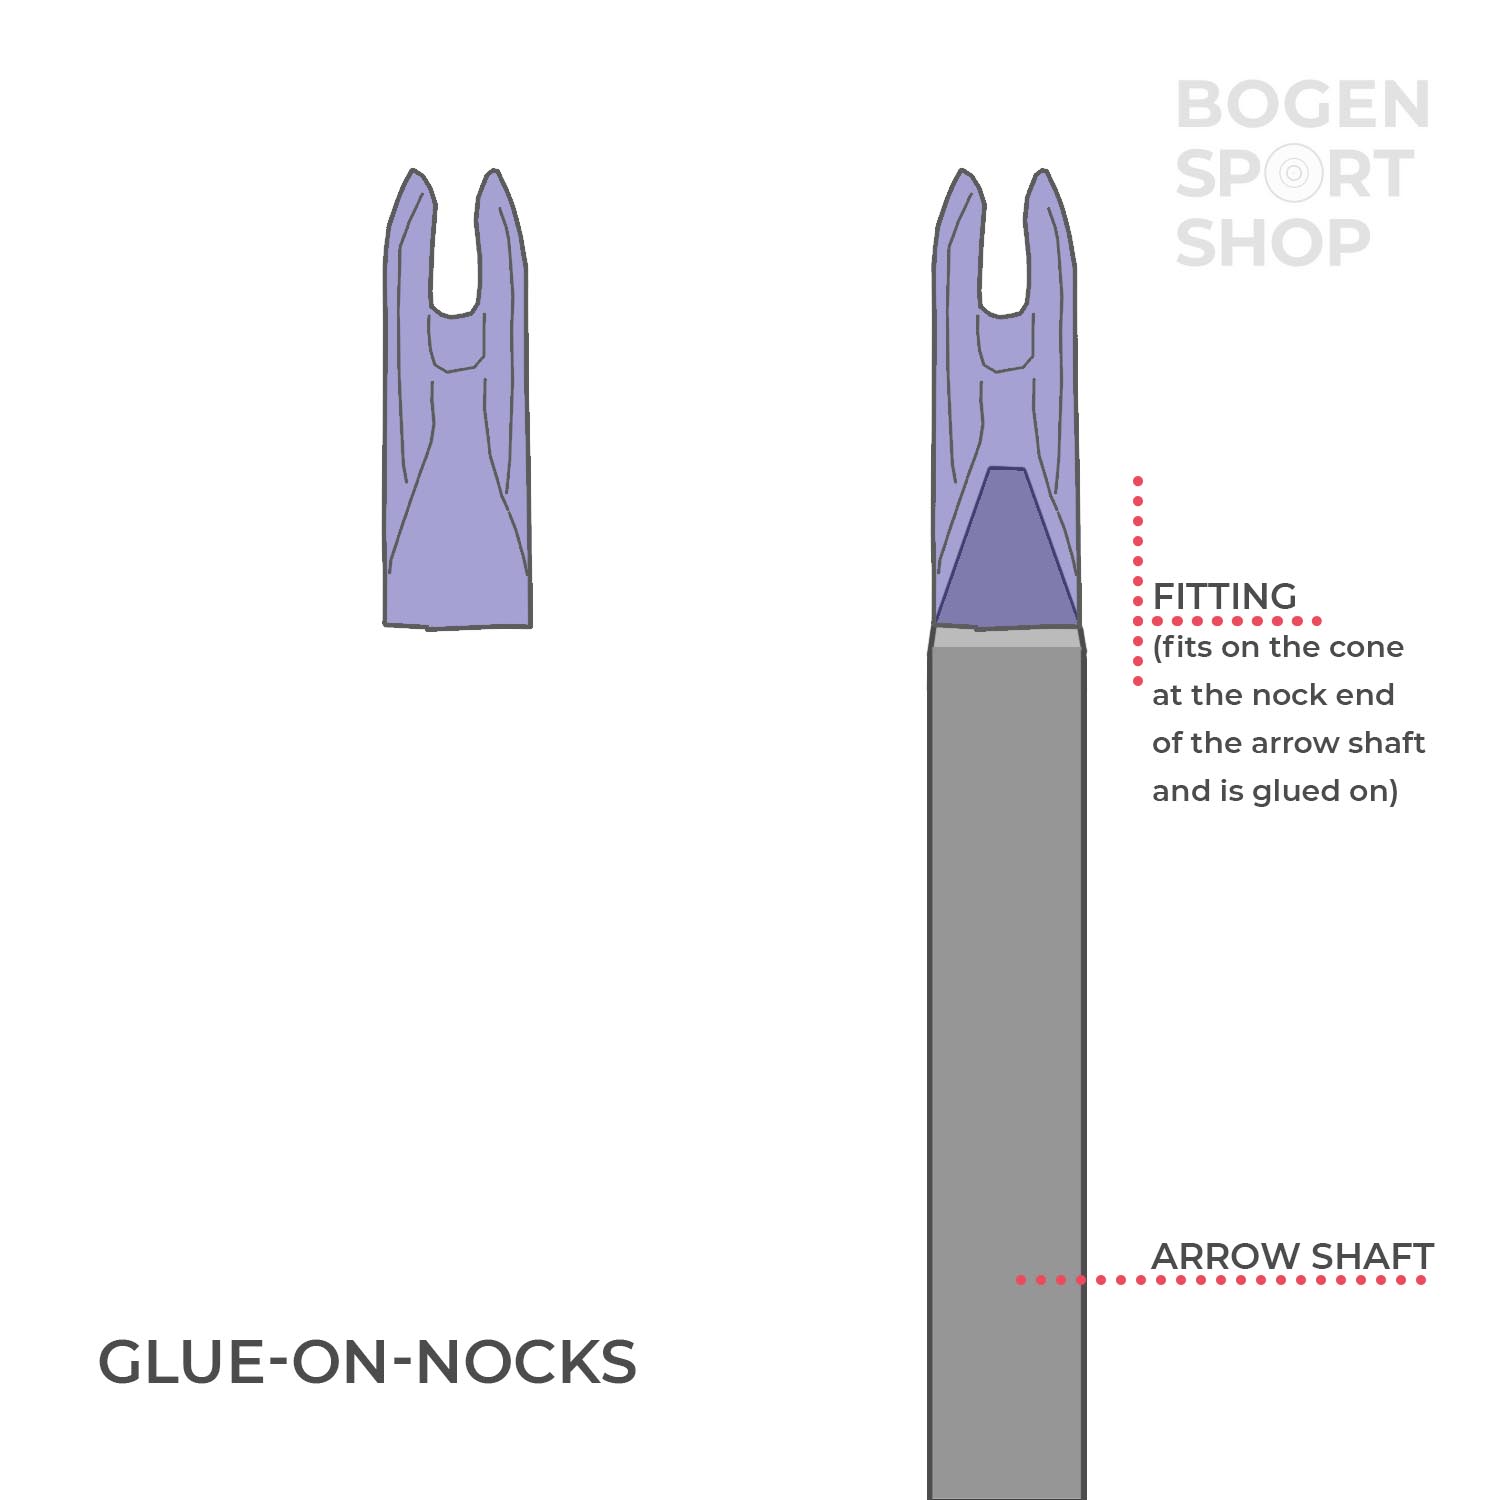
Glue-on-Nocks
Glue-on nocks are not so common today, especially since they are more fiddly to use than the other types of nocks. In general, they are mostly used for beginner’s arrows. These have a standardized cone at the nock end of the arrow, which is mandatory for glue-on nocks. In addition, glue-on nocks are still frequently used on wooden arrows.
Special Nocks:
This area is actually already considered exotic. Some would say ‚experimental‘, I for one, would just pragmatically call them ‚hybrid models‘. Hybrid because they take up and combine characteristics of the above types in the attempt to be „optimized“ versions of them. Whether they are actually ‚better‘ or not, is something you simply have to try out.
Pin-Out-Nocks
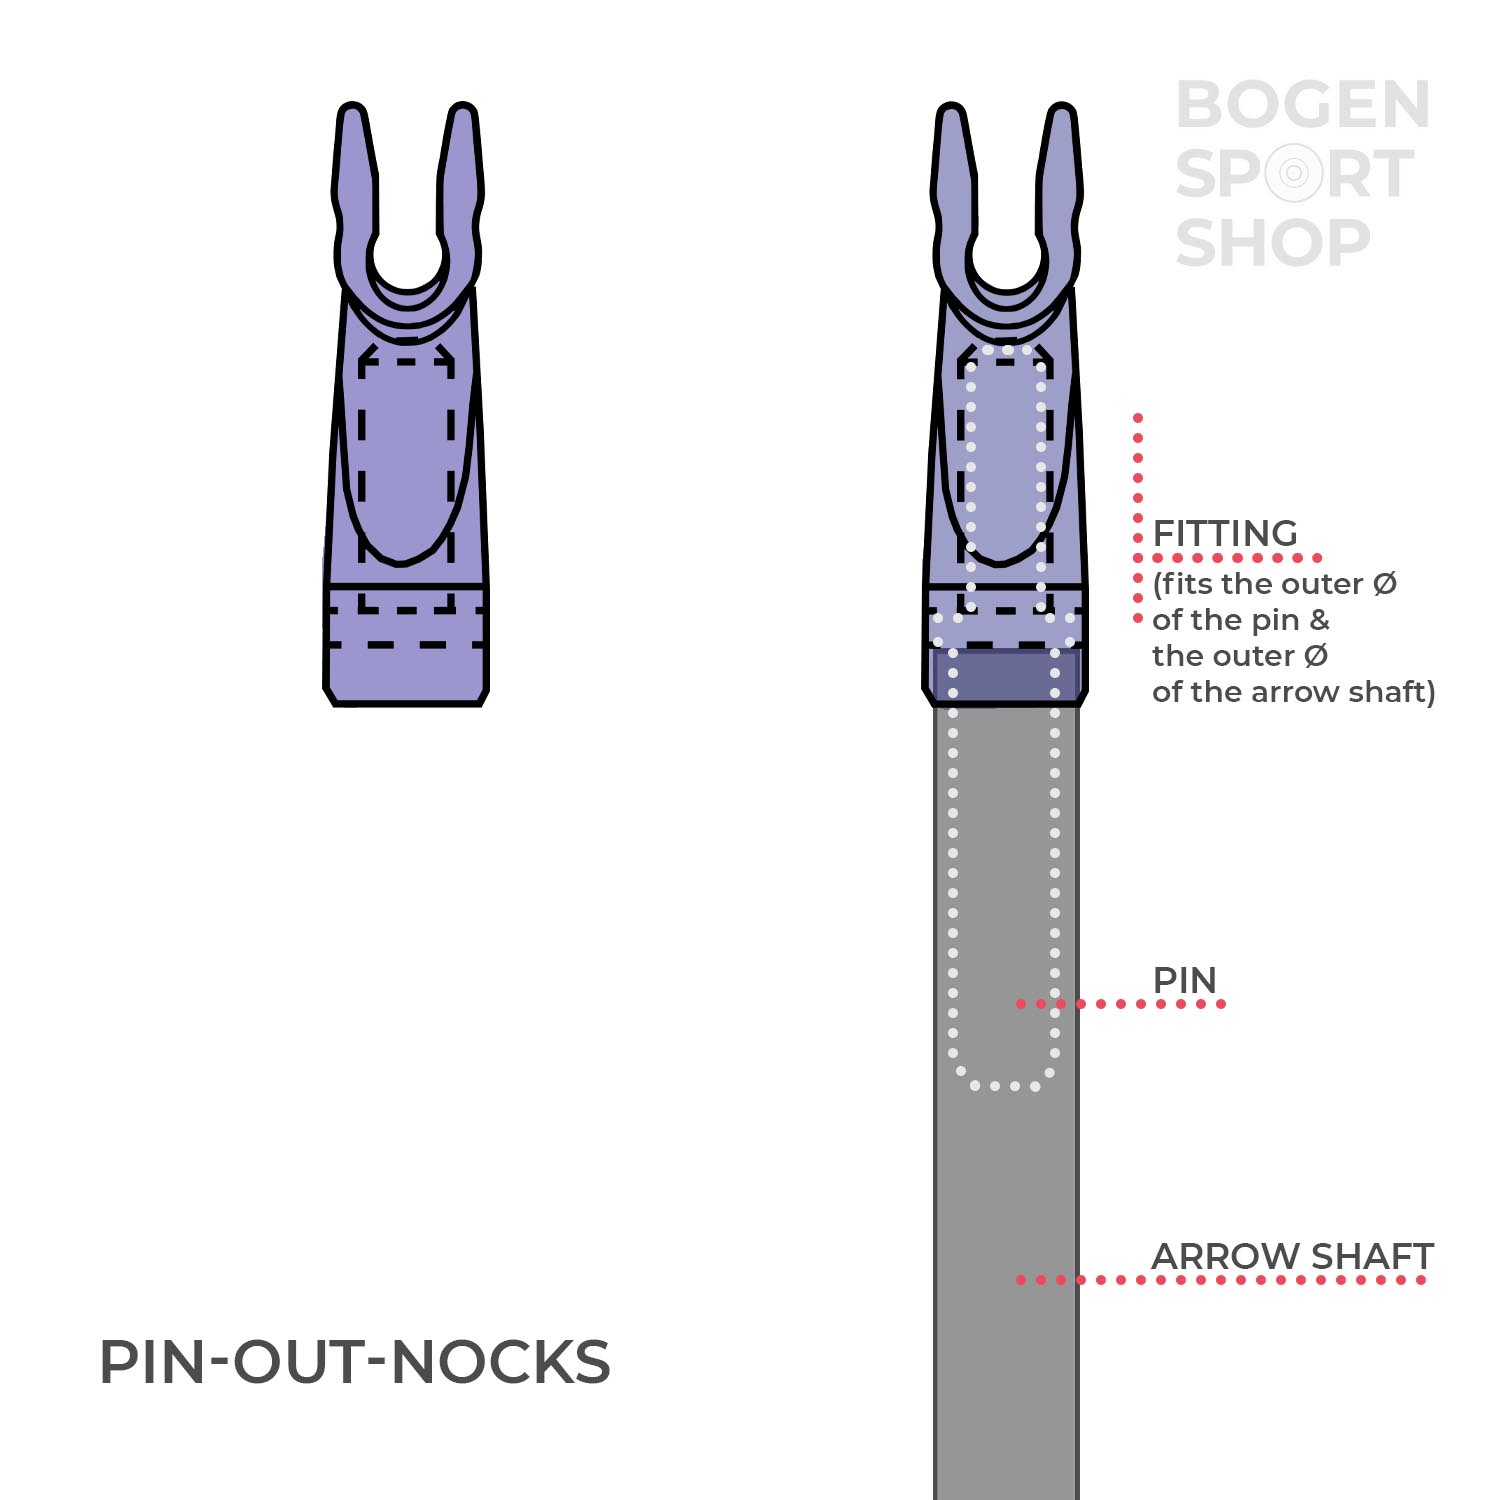
As the name implies, pin-out nocks combine the pin inserts with an out nock. You replace the Teflon tape with a pin to which you click on the nock.
In-Out-Nocks
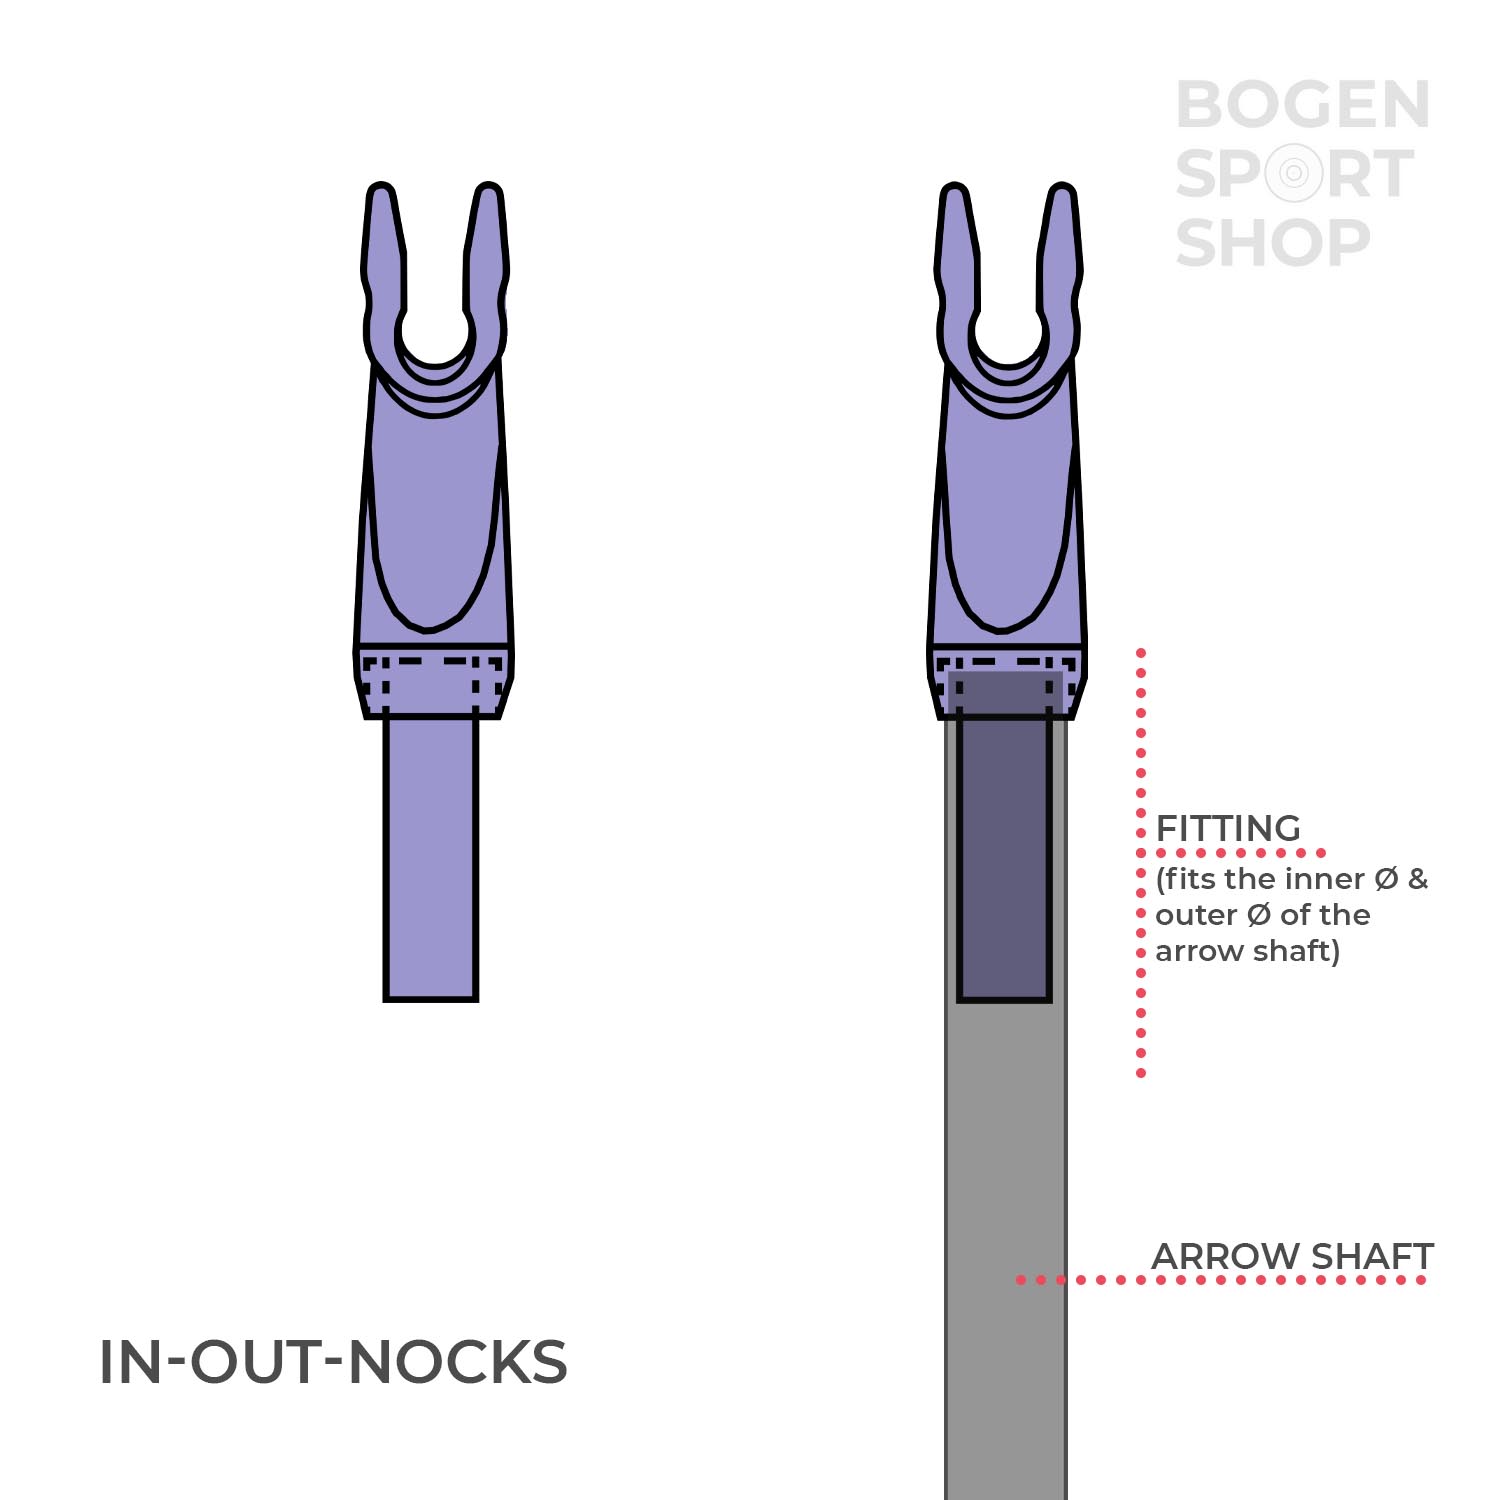
In-Out nocks combine the right feeling of inserting with the good conscience of attaching. Nothing needs to be stuffed and yet the nock wraps -one might say- snugly on the arrow shaft.